코드 구현에 앞서, 소셜 로그인 개념은 아래 포스팅을 참고하면 좋겠다.
Spring Security & OAuth2.0 & JWT Token 소셜로그인 개념 정리
Spring Security 란?Spring Security는 애플리케이션의 보안을 담당하는 프레임워크로, 사용자의 인증(로그인)과 권한(접근 제어)을 관리해준다. 예를 들어, 누가 애플리케이션에 접근할 수 있는지, 어떤
seung-yo.tistory.com
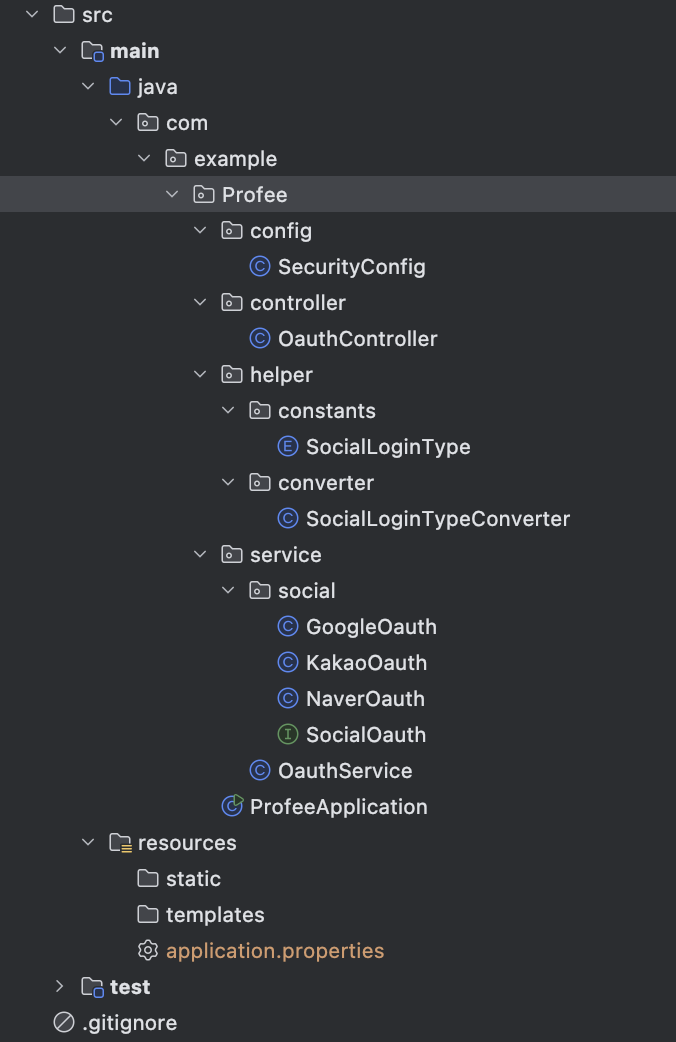
폴더 구조
Google 소셜 로그인의 전체적인 프로젝트 폴더와 파일 구조는 다음과 같다. 편의상 src 폴더부터 캡쳐했다.
소셜 로그인 요청 Redirect 처리 (Google)
1. 소셜 로그인 타입을 구분할 Enum 클래스 생성
먼저, 소셜 로그인 유형을 구분하기 위해 SocialLoginType이라는 enum 클래스를 생성한다. 이 클래스는 우리가 지원하는 소셜 로그인 플랫폼의 종류를 정의한다. 구글, 카카오, 네이버 소셜 로그인을 차례로 구현할 것이므로 세 가지 클래스를 정의했다.
SocialLoginType.java
package com.example.Profee.helper.constants;

// 소셜 로그인 타입을 구분할 enum 클래스 생성
public enum SocialLoginType {
    GOOGLE,
    KAKAO,
    NAVER
}
2. 소셜 로그인 타입별로 공통적으로 사용될 Interface 생성
다음으로, 모든 소셜 로그인 플랫폼에서 공통으로 사용할 인터페이스를 정의한다. 이 인터페이스는 각 플랫폼의 로그인 URL을 생성하는 메소드를 선언한다.
SocialOauth.java
package com.example.Profee.service.social;

import com.example.Profee.helper.constants.SocialLoginType;

// 소셜 로그인 타입별로 공통적으로 사용될 interface 생성
public interface SocialOauth {
    /**
     * 각 Social Login 페이지로 Redirect 처리할 URL Build
     * 사용자로부터 로그인 요청을 받아 Social Login Server 인증용 code 요청
     */
    String getOauthRedirectURL();

    /**
     * API Server로부터 받은 code를 활용하여 사용자 인증 정보 요청
     * @param code API Server 에서 받아온 code
     * @return API 서버로 부터 응답받은 Json 형태의 결과를 string으로 반환
     */
    String requestAccessToken(String code);

    default SocialLoginType type() {
        if (this instanceof GoogleOauth) {
            return SocialLoginType.GOOGLE;
        } else if (this instanceof NaverOauth) {
            return SocialLoginType.NAVER;
        } else if (this instanceof KakaoOauth) {
            return SocialLoginType.KAKAO;
        } else {
            return null;
        }
    }
}
3. 공통 Interface를 구현할 소셜 로그인 각 타입별 Class 생성
이제 SocialOauth 인터페이스를 구현하여 각 소셜 로그인 플랫폼에 맞는 URL을 생성하는 클래스를 생성한다. 각 클래스는 해당 소셜 로그인 플랫폼의 OAuth URL을 반환한다. 구글 로그인을 우선으로 구현하고, 카카오와 네이버 소셜 로그인은 틀만 만들었다.
GoogleOauth.java
package com.example.Profee.service.social;

import lombok.RequiredArgsConstructor;
import org.springframework.beans.factory.annotation.Value;
import org.springframework.http.HttpStatus;
import org.springframework.http.ResponseEntity;
import org.springframework.stereotype.Component;
import org.springframework.web.client.RestTemplate;

import java.io.BufferedOutputStream;
import java.io.BufferedReader;
import java.io.IOException;
import java.io.InputStreamReader;
import java.net.HttpURLConnection;
import java.net.URL;
import java.util.HashMap;
import java.util.Map;
import java.util.stream.Collectors;

// 공통 interface를 구현할 소셜 로그인 각 타입별 Class 생성 (Google)
@Component
@RequiredArgsConstructor
public class GoogleOauth implements SocialOauth {
    @Value("${sns.google.url}")
    private String GOOGLE_SNS_BASE_URL;
    @Value("${sns.google.client.id}")
    private String GOOGLE_SNS_CLIENT_ID;
    @Value("${sns.google.callback.url}")
    private String GOOGLE_SNS_CALLBACK_URL;
    @Value("${sns.google.client.secret}")
    private String GOOGLE_SNS_CLIENT_SECRET;
    @Value("${sns.google.token.url}")
    private String GOOGLE_SNS_TOKEN_BASE_URL;

    @Override
    public String getOauthRedirectURL() {
        Map<String, Object> params = new HashMap<>();
        params.put("scope", "profile");
        params.put("response_type", "code");
        params.put("client_id", GOOGLE_SNS_CLIENT_ID);
        params.put("redirect_uri", GOOGLE_SNS_CALLBACK_URL);

        String parameterString = params.entrySet().stream()
                .map(x -> x.getKey() + "=" + x.getValue())
                .collect(Collectors.joining("&"));

        return GOOGLE_SNS_BASE_URL + "?" + parameterString;
    }

    @Override
    public String requestAccessToken(String code) {
        RestTemplate restTemplate = new RestTemplate();

        Map<String, Object> params = new HashMap<>();
        params.put("code", code);
        params.put("client_id", GOOGLE_SNS_CLIENT_ID);
        params.put("client_secret", GOOGLE_SNS_CLIENT_SECRET);
        params.put("redirect_uri", GOOGLE_SNS_CALLBACK_URL);
        params.put("grant_type", "authorization_code");

        ResponseEntity<String> responseEntity =
                restTemplate.postForEntity(GOOGLE_SNS_TOKEN_BASE_URL, params, String.class);

        if (responseEntity.getStatusCode() == HttpStatus.OK) {
            return responseEntity.getBody();
        }
        return "구글 로그인 요청 처리 실패";
    }

    public String requestAccessTokenUsingURL(String code) {
        try {
            URL url = new URL(GOOGLE_SNS_TOKEN_BASE_URL);
            HttpURLConnection conn = (HttpURLConnection) url.openConnection();
            conn.setRequestMethod("POST");
            conn.setRequestProperty("Content-Type", "application/x-www-form-urlencoded");
            conn.setDoOutput(true);

            Map<String, Object> params = new HashMap<>();
            params.put("code", code);
            params.put("client_id", GOOGLE_SNS_CLIENT_ID);
            params.put("client_secret", GOOGLE_SNS_CLIENT_SECRET);
            params.put("redirect_uri", GOOGLE_SNS_CALLBACK_URL);
            params.put("grant_type", "authorization_code");

            String parameterString = params.entrySet().stream()
                    .map(x -> x.getKey() + "=" + x.getValue())
                    .collect(Collectors.joining("&"));

            BufferedOutputStream bous = new BufferedOutputStream(conn.getOutputStream());
            bous.write(parameterString.getBytes());
            bous.flush();
            bous.close();

            BufferedReader br = new BufferedReader(new InputStreamReader(conn.getInputStream()));

            StringBuilder sb = new StringBuilder();
            String line;

            while ((line = br.readLine()) != null) {
                sb.append(line);
            }

            if (conn.getResponseCode() == 200) {
                return sb.toString();
            }
            return "구글 로그인 요청 처리 실패";
        } catch (IOException e) {
            throw new IllegalArgumentException("알 수 없는 구글 로그인 Access Token 요청 URL 입니다 :: " + GOOGLE_SNS_TOKEN_BASE_URL);
        }
    }
}
KakaoOauth.java
package com.example.Profee.service.social;

import org.springframework.stereotype.Component;

// 공통 interface를 구현할 소셜 로그인 각 타입별 Class 생성 (Kakao)
@Component
public class KakaoOauth implements SocialOauth {
    @Override
    public String getOauthRedirectURL() {
        return "";
    }

    @Override
    public String requestAccessToken(String code) {
        return null;
    }
}
NaverOauth.java
package com.example.Profee.service.social;

import org.springframework.stereotype.Component;

// 공통 interface를 구현할 소셜 로그인 각 타입별 Class 생성 (Naver)
@Component
public class NaverOauth implements SocialOauth {
    @Override
    public String getOauthRedirectURL() {
        return "";
    }

    @Override
    public String requestAccessToken(String code) {
        return null;
    }
}
4. Service Class 생성
이제 소셜 로그인 요청을 처리하는 OauthService 클래스를 생성한다. 이 클래스는 요청된 소셜 로그인 타입에 따라 적절한 소셜 로그인 클래스의 getOauthRedirectURL 메소드를 호출하고, URL로 리다이렉트하는 역할을 한다.
OauthService.java
package com.example.Profee.service;

import lombok.RequiredArgsConstructor;
import com.example.Profee.helper.constants.SocialLoginType;
import com.example.Profee.service.social.SocialOauth;
import org.springframework.stereotype.Service;

import jakarta.servlet.http.HttpServletResponse;
import java.io.IOException;
import java.util.List;

// Service Class 생성
@Service
@RequiredArgsConstructor
public class OauthService {
    private final List<SocialOauth> socialOauthList;
    private final HttpServletResponse response;

    public void request(SocialLoginType socialLoginType) {
        SocialOauth socialOauth = this.findSocialOauthByType(socialLoginType);
        String redirectURL = socialOauth.getOauthRedirectURL();
        try {
            response.sendRedirect(redirectURL);
        } catch (IOException e) {
            e.printStackTrace();
        }
    }

    public String requestAccessToken(SocialLoginType socialLoginType, String code) {
        SocialOauth socialOauth = this.findSocialOauthByType(socialLoginType);
        return socialOauth.requestAccessToken(code);
    }

    private SocialOauth findSocialOauthByType(SocialLoginType socialLoginType) {
        return socialOauthList.stream()
                .filter(x -> x.type() == socialLoginType)
                .findFirst()
                .orElseThrow(() -> new IllegalArgumentException("알 수 없는 SocialLoginType 입니다."));
    }
}
5. Controller 생성
다음으로 소셜 로그인 요청을 처리하는 OauthController 클래스를 생성한다. 이 클래스는 사용자가 로그인 버튼을 클릭했을 때, 해당 소셜 로그인 타입에 맞는 URL로 리다이렉트하도록 한다. 즉, 컨트롤러는 클라이언트의 요청을 받아서 OauthService를 통해 적절한 리다이렉트를 수행하는 것이다.
OauthController.java
package com.example.Profee.controller;

import lombok.RequiredArgsConstructor;
import lombok.extern.slf4j.Slf4j;
import com.example.Profee.helper.constants.SocialLoginType;
import com.example.Profee.service.OauthService;
import org.springframework.web.bind.annotation.*;

// Controller 생성
@RestController
@CrossOrigin
@RequiredArgsConstructor
@RequestMapping(value = "/auth")
@Slf4j
public class OauthController {
    private final OauthService oauthService;

    /**
     * 사용자로부터 SNS 로그인 요청을 Social Login Type 을 받아 처리
     * @param socialLoginType (GOOGLE, NAVER, KAKAO)
     */
    @GetMapping(value = "/{socialLoginType}")
    public void socialLoginType(
            @PathVariable(name = "socialLoginType") SocialLoginType socialLoginType) {
        log.info(">> 사용자로부터 SNS 로그인 요청을 받음 :: {} Social Login", socialLoginType);
        oauthService.request(socialLoginType);
    }

    /**
     * Social Login API Server 요청에 의한 callback 을 처리
     * @param socialLoginType (GOOGLE, NAVER, KAKAO)
     * @param code API Server 로부터 넘어노는 code
     * @return SNS Login 요청 결과로 받은 Json 형태의 String 문자열 (access_token, refresh_token 등)
     */
    @GetMapping(value = "/{socialLoginType}/callback")
    public String callback(
            @PathVariable(name = "socialLoginType") SocialLoginType socialLoginType,
            @RequestParam(name = "code") String code) {
        log.info(">> 소셜 로그인 API 서버로부터 받은 code :: {}", code);
        return oauthService.requestAccessToken(socialLoginType, code);
    }
}
6. Converter 생성
URL 경로에서 소셜 로그인 타입을 변환하기 위해 SocialLoginTypeConverter 클래스를 생성한다. 이 클래스는 URL 경로의 소문자를 enum 타입으로 변환하는 역할을 한 다. 이 컨버터를 통해, URL에서 전달된 socialLoginType 파라미터를 SocialLoginType enum으로 변환할 수 있다. 예를 들어, http://localhost:8080/auth/google URL 요청 시, SocialLoginType.GOOGLE로 변환된다.
SocialLoginTypeConverter.java
package com.example.Profee.helper.converter;

import com.example.Profee.helper.constants.SocialLoginType;
import org.springframework.context.annotation.Configuration;
import org.springframework.core.convert.converter.Converter;

// Converter 생성
@Configuration
public class SocialLoginTypeConverter implements Converter<String, SocialLoginType> {
    @Override
    public SocialLoginType convert(String s) {
        return SocialLoginType.valueOf(s.toUpperCase());
    }
}
Spring Security 설정: 소셜 로그인 및 인증 처리
Spring Security를 설정하여 소셜 로그인 엔드포인트와 다른 인증 관련 요청을 처리하게 되면 웹 애플리케이션의 보안을 강화할 수 있다. 아래는 SecurityConfig 클래스에 대한 코드와 설명이다.
SecurityConfig.java
package com.example.Profee.config;

import org.springframework.context.annotation.Bean;
import org.springframework.context.annotation.Configuration;
import org.springframework.security.config.annotation.web.builders.HttpSecurity;
import org.springframework.security.config.annotation.web.configuration.EnableWebSecurity;
import org.springframework.security.web.SecurityFilterChain;

// 시큐리티 설정
@Configuration
@EnableWebSecurity
public class SecurityConfig {

    @Bean
    public SecurityFilterChain securityFilterChain(HttpSecurity http) throws Exception {
        http
                .authorizeRequests(authorizeRequests ->
                        authorizeRequests
                                .requestMatchers("/auth/google", "/auth/kakao", "/auth/naver").permitAll() // 소셜 로그인 엔드포인트 접근 허용
                                .anyRequest().authenticated() // 나머지 요청은 인증을 요구합니다.
                )
                .formLogin(formLogin ->
                        formLogin
                                .loginPage("/login") // 로그인 페이지 URL 설정
                                .permitAll() // 로그인 페이지는 모든 사용자에게 허용됩니다.
                )
                .csrf(csrf ->
                        csrf.disable() // CSRF 보호 비활성화 (개발 중에만 사용)
                );

        return http.build();
    }
}- @Configuration 및 @EnableWebSecurity
- @Configuration: 이 클래스가 Spring의 설정 클래스를 나타낸다.
- @EnableWebSecurity: Spring Security의 웹 보안 기능을 활성화한다. 이를 통해 웹 애플리케이션에 보안 설정을 적용할 수 있다.
- securityFilterChain 메소드
- authorizeRequests:
- requestMatchers("/auth/google", "/auth/kakao", "/auth/naver").permitAll(): 소셜 로그인 엔드포인트인 /auth/google, /auth/kakao, /auth/naver에 대한 접근을 인증 없이 허용한다. 이 설정은 소셜 로그인 요청을 처리하는 엔드포인트로, 사용자가 인증되지 않아도 접근할 수 있도록 한다.
- anyRequest().authenticated(): 나머지 모든 요청은 인증된 사용자만 접근할 수 있도록 설정한다. 즉, 로그인된 사용자만 애플리케이션의 다른 부분에 접근할 수 있다.
- formLogin:
- loginPage("/login"): 로그인 페이지의 URL을 /login으로 설정한다. 사용자는 이 페이지를 통해 로그인 폼에 접근하고 인증을 진행할 수 있다.
- permitAll(): 로그인 페이지에 대한 접근을 인증되지 않은 사용자에게도 허용한다. 이는 로그인 페이지를 모든 사용자가 접근할 수 있도록 하기 위함이다.
- csrf:
- csrf.disable(): CSRF (Cross-Site Request Forgery) 보호를 비활성화한다. CSRF 공격은 사용자의 세션을 악용하여 악의적인 요청을 보내는 공격 방식이다. 개발 중에는 편리함을 위해 비활성화할 수 있지만, 실제 프로덕션 환경에서는 CSRF 보호를 활성화하는 것이 안전하다.
- authorizeRequests:
- http.build()
- http.build(): 설정된 보안 규칙을 기반으로 SecurityFilterChain 객체를 생성한다.
이러한 Security 설정을 통해 소셜 로그인 엔드포인트는 인증 없이 접근할 수 있으며, 나머지 요청은 인증된 사용자만 접근할 수 있도록 보호된다. 또한, 로그인 페이지는 모든 사용자에게 열려 있어야 한다. CSRF 보호는 개발 중에는 비활성화되지만, 실제 운영 환경에서는 반드시 활성화해야 한다.
application.properties 파일 설정
resources 폴더 하위에 위치한 application.properties 파일은 다음과 같다. 구글 OAuth를 통해 발급받은 클라이언트 아이디와 시크릿을 입력해주면 되겠다.
application.properties
sns.google.url=https://accounts.google.com/o/oauth2/v2/auth
sns.google.client.id=구글 클라이언트 아이디
sns.google.client.secret=구글 클라이언트 시크릿
sns.google.callback.url=http://localhost:8080/auth/google/callback
sns.google.token.url=https://oauth2.googleapis.com/token
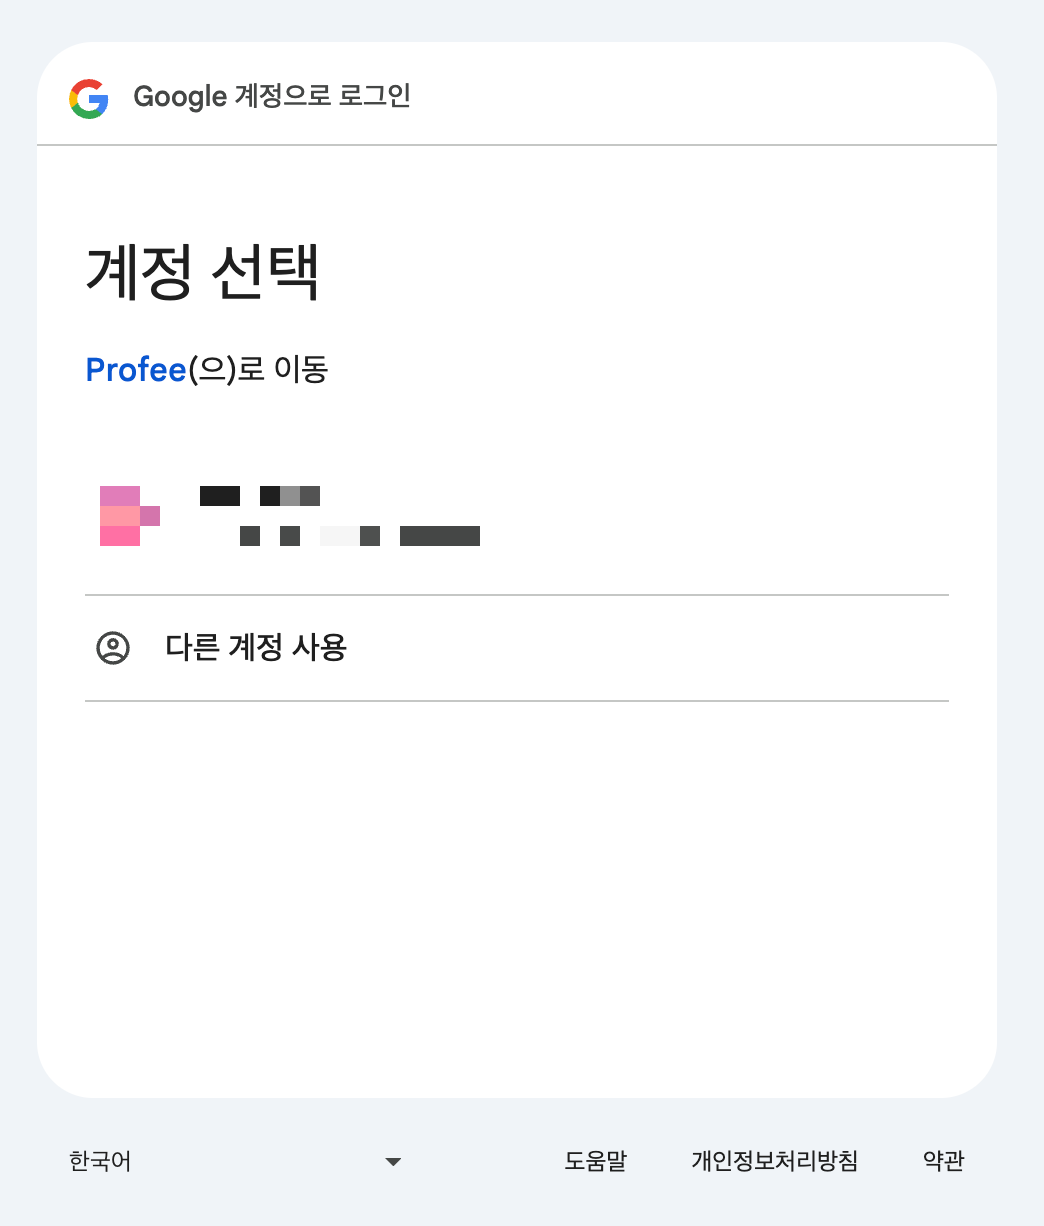
이제 Spring Boot 서버를 구동시킨 후 http://localhost:8080/auth/google 로 들어가면 다음과 같이 구글 소셜 로그인이 잘 구현된 것을 확인할 수 있다. 😀

👇🏻 400 오류: redirect_uri_mismatch 에러가 뜬다면 👇🏻
[SpringBoot] 400 오류: redirect_uri_mismatch 오류 해결
Google 소셜 로그인 테스트 중 다음과 같은 오류를 만났다. [ 액세스 차단됨: 이 앱의 요청이 잘못되었습니다 ] 400 오류: redirect_uri_mismatch 오류 세부정보를 누르면 이런 화면을 볼 수 있다. 이
seung-yo.tistory.com
'프로젝트 > Profee' 카테고리의 다른 글
| [SpringBoot] Kakao 소셜 로그인 구현: OAuth2.0 & Spring Security 활용 (0) | 2024.09.11 |
|---|---|
| [SpringBoot] 400 오류: redirect_uri_mismatch 오류 해결 (0) | 2024.09.10 |
| [RN] React Native 프로젝트 Xcode 오류 해결: Could Not Open File (0) | 2024.09.07 |
| [RN] Error: spawn cmd ENOENT 오류 해결 (1) | 2024.09.07 |
| React-native 개발 환경 구축 (MacOS) (6) | 2024.09.07 |